
How to Add a Photo to a Frame Online in 6 Easy Steps
Online Photo Editing Guide
If you want to learn how to add a photo to a frame online, you can complete the entire process without Photoshop or complicated design software. Choose a ready-made MRRFrame template, upload your picture, adjust its position, and download the finished design without a watermark or account registration.

The easiest way to add a photo to a frame online is to open a ready-made frame on MRRFrame, upload your image into the available photo slot, drag or zoom the picture until the subject fits correctly, review the full design, and download the result. No account is required, and the finished image does not include a watermark.
What You Need Before Adding a Photo to a Frame
Before learning how to add a photo to a frame online, prepare a clear source image and choose a template with a photo slot that matches its orientation.
You do not need professional editing experience to put a picture inside a digital frame. Preparing the right image before opening the editor will, however, make the process faster and produce a cleaner result.
- A clear photo saved on your phone, tablet, or computer.
- A stable internet connection and an up-to-date web browser.
- A frame template that matches the occasion and number of photos.
- A few seconds to reposition or resize each image inside its photo slot.
A JPG or PNG file is usually the safest option. Start with the original photo whenever possible. Images downloaded from social media, screenshots, or heavily compressed files may look soft after they are enlarged.
For a technical overview of JPG, PNG, WebP, AVIF, and other commonly used image formats, see MDN’s image file type and format guide.
Check the orientation of the frame before choosing your image. A portrait photo usually fits a vertical frame more naturally, while a landscape photo works better in a wide horizontal slot.
How to Add a Photo to a Frame Online: Step 1 — Choose a Template
Select a frame based on its purpose
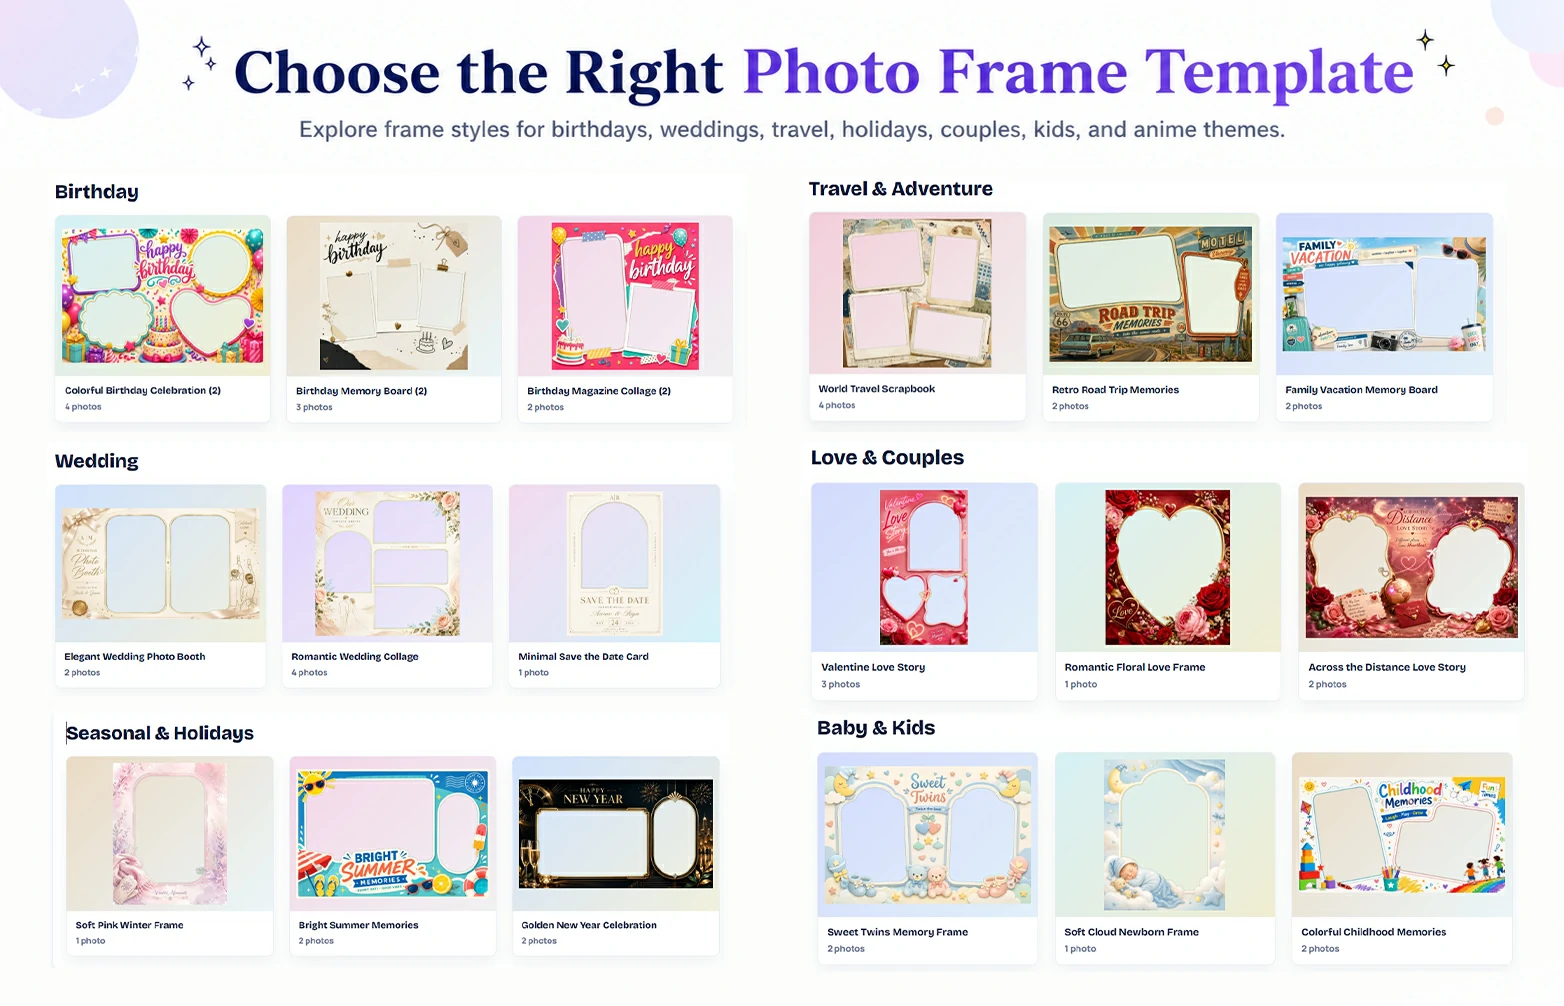
Start by opening the MRRFrame template gallery and browsing the available designs. Instead of choosing only by color, consider where the finished image will be used and how many pictures you want to include.
A one-photo template is a good option for portraits, profile pictures, announcements, and single-subject designs. Templates with two or more photo slots work well for family memories, birthday collages, travel highlights, wedding stories, and gaming moments.
For social posts
Use square, portrait, or vertical-story templates that match the platform where you plan to share the image.
For desktop or video
Choose a landscape frame such as 16:9 or 3:2 when the final image will be viewed on a wide screen.
For one main portrait
Look for a large central photo slot with limited decoration covering the subject.
For a photo collection
Choose a collage-style template with enough clearly separated slots for every image.
Step 2: Upload Your Photo to the Online Frame
Add an image from your device
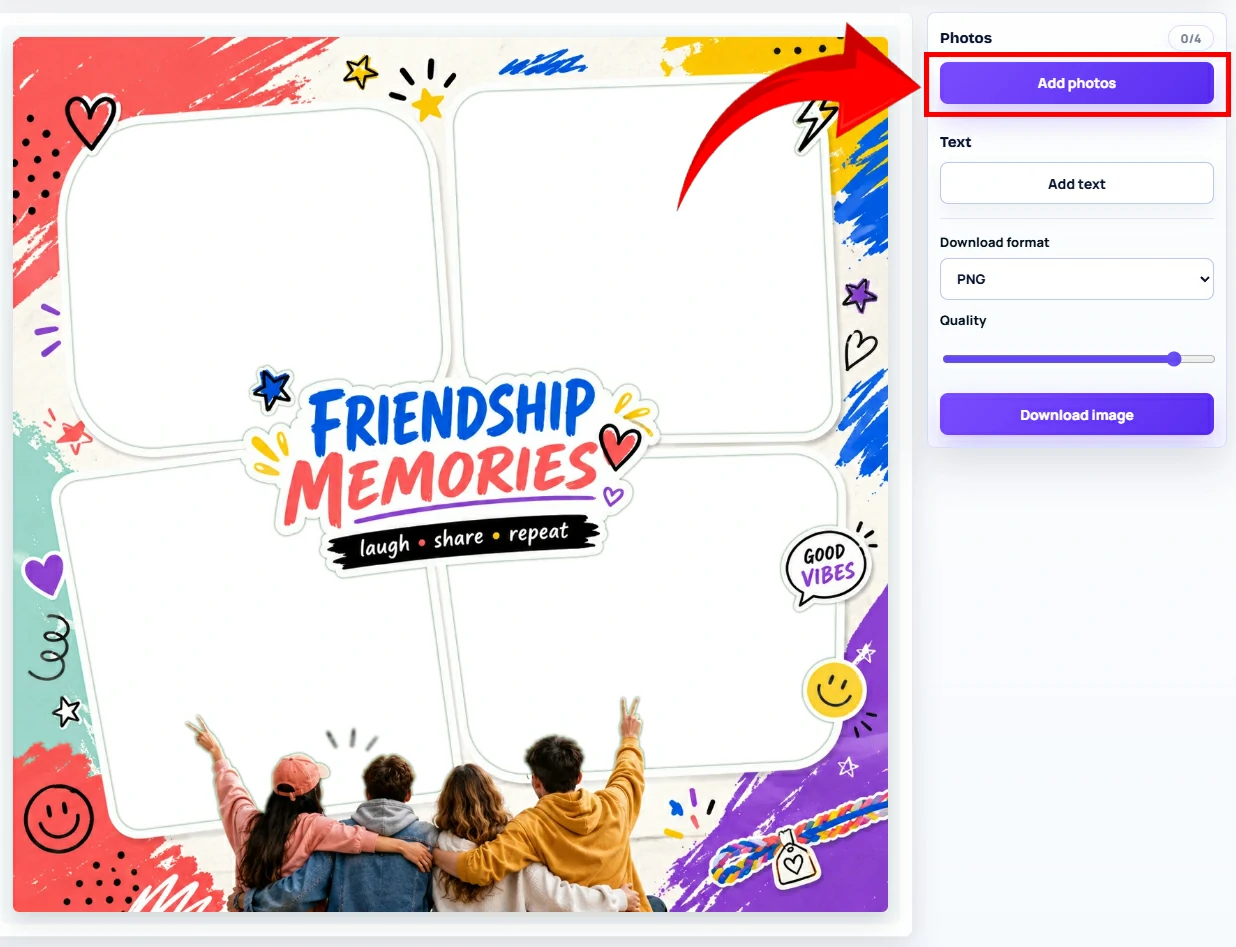
When learning how to add a photo to a frame online, begin by selecting the photo slot you want to fill. Use the upload control provided by the editor, choose an image from your device, and allow it to load completely before making any adjustments.
When the image appears inside the frame, the editor may crop part of it to match the shape and ratio of the selected slot. This is normal. You will correct the visible area during the positioning step.
Avoid uploading a thumbnail or a screenshot of the photo. A small source image may appear acceptable on the editing screen but look blurry when the finished design is viewed at full size.
Try It Now With a Ready-Made Frame
Open MRRFrame, choose a template, upload your picture, and create the finished design directly in your browser. There is no watermark and no registration step.
Create a Framed Photo OnlineStep 3: Fill Every Photo Slot in a Multi-Photo Frame
If you are learning how to add a photo to a frame online with several pictures, treat each photo slot as a separate image container. Select one slot, assign its photo, finish the positioning, and then continue to the next available area.
Some templates contain two, three, four, or more photo areas. Completing them one at a time reduces the risk of placing the wrong picture in the wrong slot.
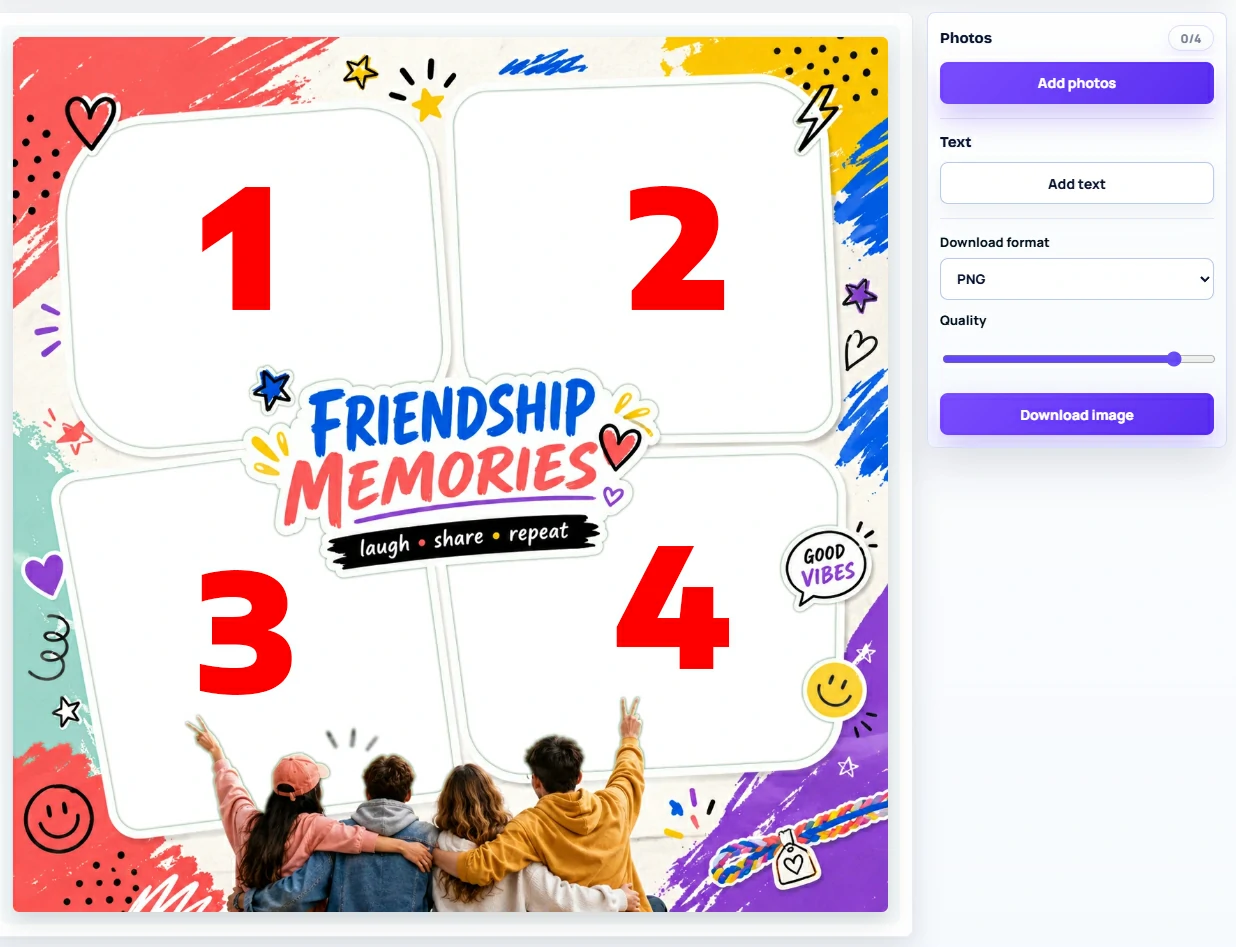
Before uploading, arrange the source images in the order you want them to appear. For a story-style frame, place the opening image first, supporting moments in the middle, and the strongest or most emotional photo in the final slot.
When several photos appear in one frame, try to use images with similar brightness and color. A very dark photo beside an overexposed photo can make the collage feel unbalanced.
Step 4: Resize and Position the Photo Inside the Frame
Move the important subject into the visible area
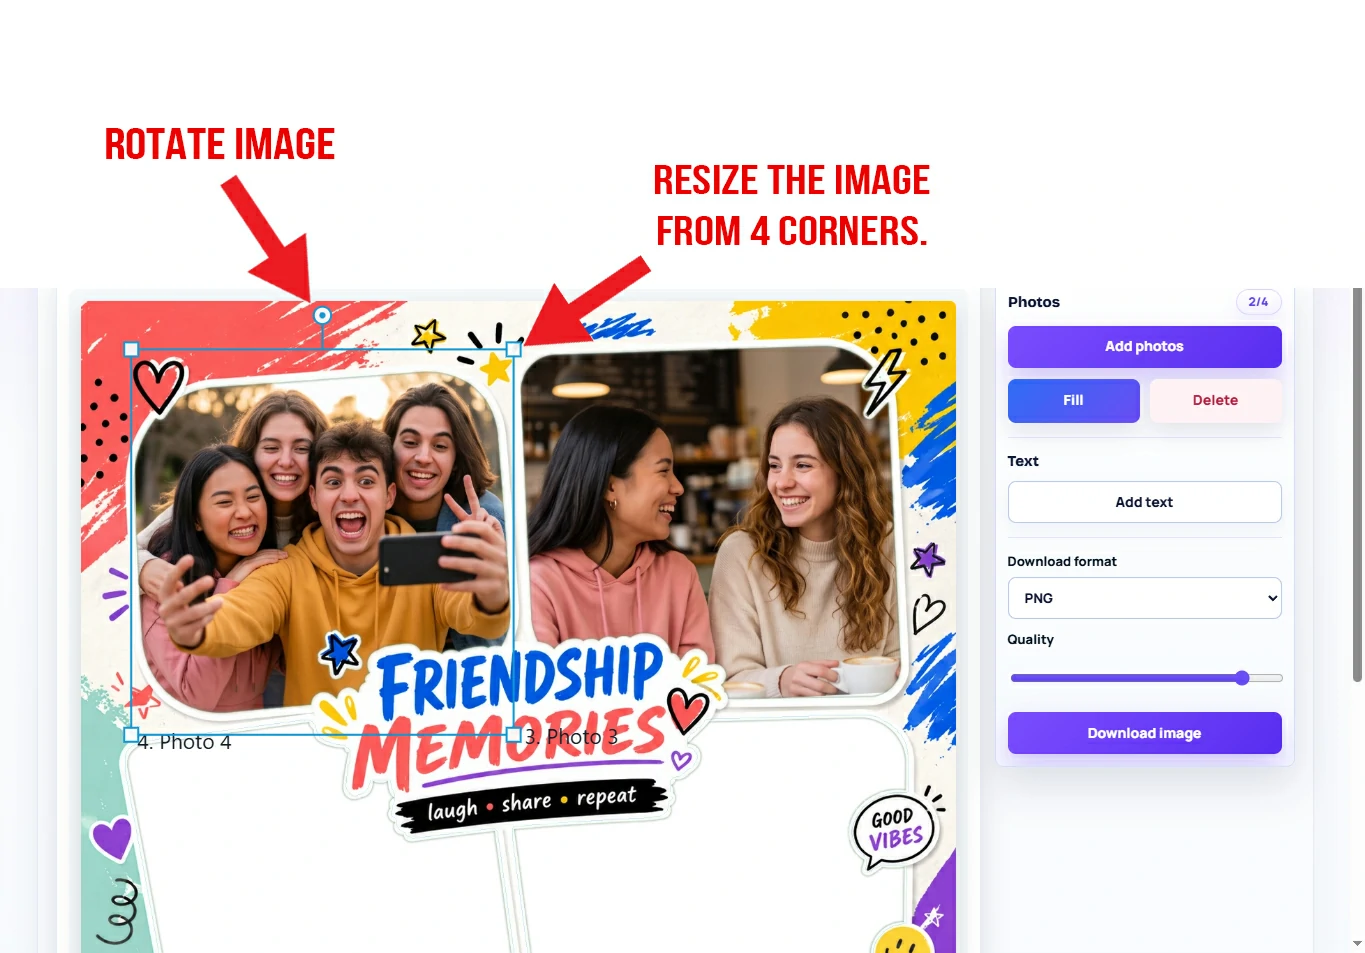
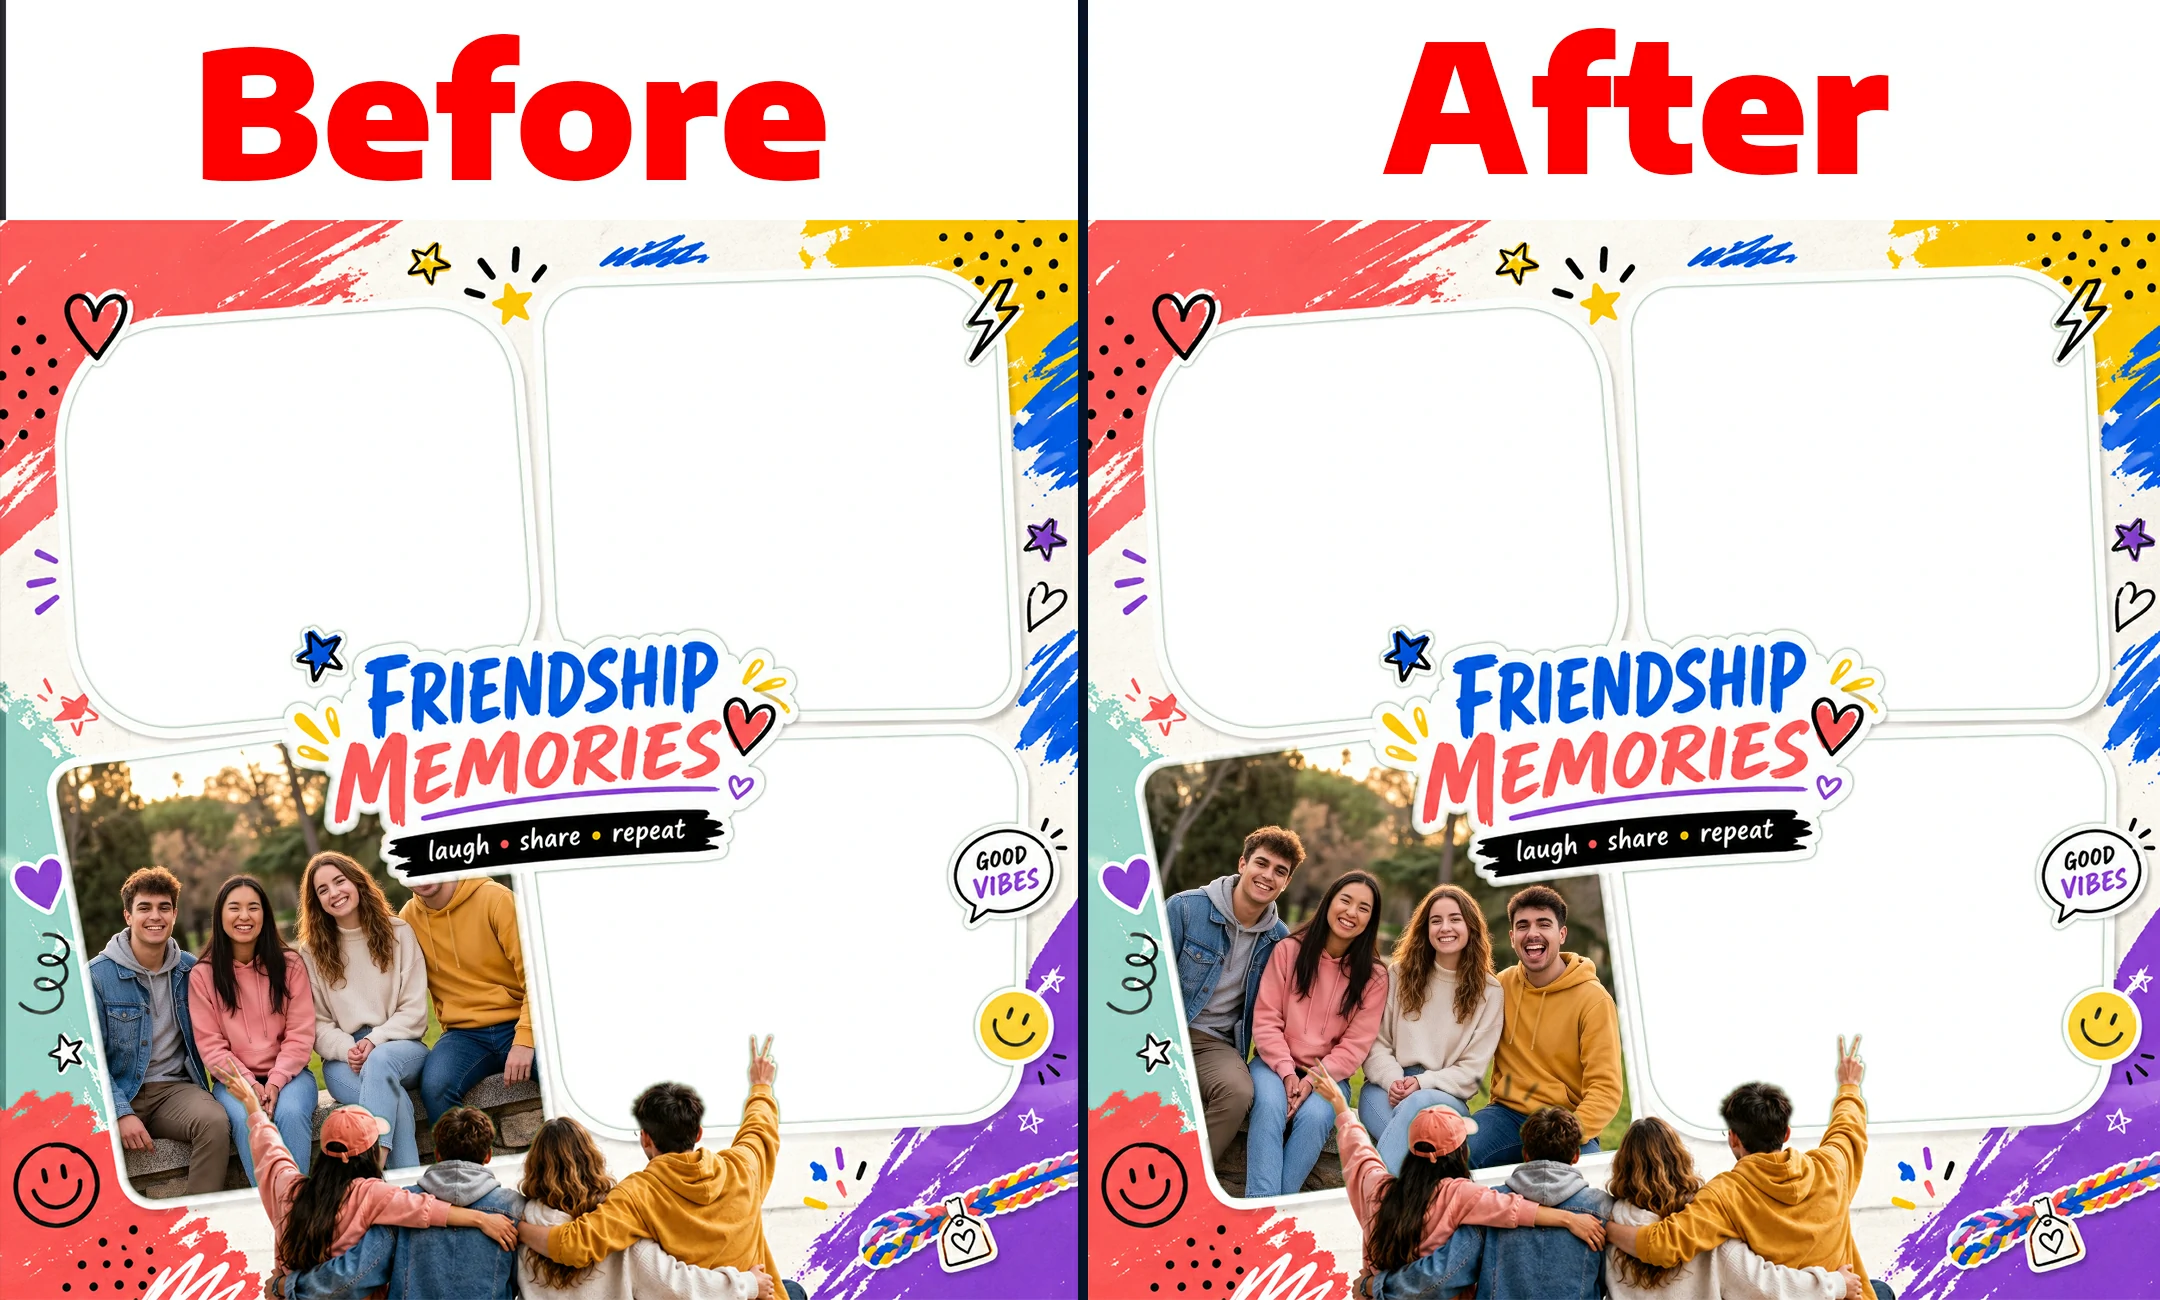
Once the photo is inside its slot, adjust it until the main subject is clearly visible. Depending on the editor controls, you may be able to drag the image, zoom in, zoom out, or reposition it within the masked area.
Careful positioning is one of the most important parts of learning how to add a photo to a frame online. Keep faces, text, products, pets, or other important details away from the edges of the slot.
How to position different types of photos
| Photo type | Recommended positioning | What to avoid |
|---|---|---|
| Close-up portrait | Keep both eyes visible and leave some space above the head. | Cutting through the chin, forehead, or hairline. |
| Full-body photo | Center the person and preserve enough room around the body. | Zooming in until hands or feet disappear unintentionally. |
| Group photo | Position the entire group inside the slot before increasing the zoom. | Placing people at the far edges where the frame may cover them. |
| Landscape or travel photo | Use the horizon and main landmark to guide the crop. | Centering an empty area while the main landmark is cut off. |
| Product photo | Keep the complete product visible with even space around it. | Allowing labels, corners, or important features to leave the slot. |
Step 5: Review the Entire Design Before Saving
Reviewing the complete composition is an important part of learning how to add a photo to a frame online because a picture may look correct inside one slot while still feeling unbalanced within the full design.
Check the frame at both large and small sizes
Before saving the finished image, stop looking only at the active photo slot and review the complete composition. The subject should be easy to recognize, every photo area should be filled correctly, and no important detail should be hidden behind the frame decoration.
- Every intended photo slot contains the correct image.
- Faces and important subjects are not touching the edges.
- No image appears stretched, unusually soft, or heavily pixelated.
- The visual order makes sense in templates containing multiple photos.
- The frame ratio is suitable for the intended platform or screen.
Step 6: Save Your Framed Photo
Export the completed design
The final step in how to add a photo to a frame online is to save the completed composition. When you are satisfied with the preview, use the editor’s save or download option to create the finished image.
Wait until the export has completed before closing the page or switching to another template. Open the saved file once it reaches your device to confirm that the image downloaded correctly.

Create Your Framed Photo Now
Choose a ready-made MRRFrame template, upload your picture, adjust the crop, and download the finished image directly from your browser. No watermark and no account registration required.
Start Creating for FreeHow to Prevent Your Photo From Being Cropped Incorrectly
One of the most common problems when learning how to add a photo to a frame online is unwanted cropping. This usually happens because the source photo and the frame slot use different aspect ratios.
For example, a wide landscape image cannot completely fill a tall portrait slot without losing part of its left and right sides. Understanding this difference makes it easier to choose a better template or reposition the image.
Choose a photo with a similar orientation
Match portrait photos with vertical slots and landscape photos with horizontal slots whenever possible. A similar orientation gives you more room to adjust the image without removing important content.
Leave space around the subject
Photos with some background around the main subject are easier to fit than extremely tight close-ups. That extra space provides a safe cropping area while keeping the face or object intact.
Avoid placing faces directly against the edge
Even when the complete face remains visible, an eye, chin, or forehead placed too close to the border can make the composition feel uncomfortable. Leave a small visual margin around each important subject.
Try another template when the image does not fit
Do not force every photo into the first frame you choose. If the required crop removes too much of the subject, return to the gallery and select a template with a more suitable slot shape or ratio.
Common Mistakes When Adding Pictures to Frames Online
Uploading a low-resolution image
A small image has limited detail. Enlarging it to fill a large slot can make faces, text, and edges look blurry. Use the largest available version of the original photo.
Choosing a frame only because of its decoration
A beautiful frame may still be unsuitable if its photo slot has the wrong orientation or is too small for the subject. Evaluate the usable photo area before focusing on decorative style.
Zooming in more than necessary
Increasing the zoom can make the subject look more prominent, but it also removes content from the edges. Zoom only enough to fill the slot and eliminate unwanted empty areas.
Forgetting one of the photo slots
Multi-photo frames can contain several separate placeholders. Review the entire canvas before saving to ensure that no slot remains empty or contains the wrong image.
Ignoring the final display size
A detail that looks clear on a large desktop screen may become difficult to see when the image appears as a small social post. Preview the complete design at a reduced size before exporting it.
When Can You Use an Online Photo Frame?
Once you understand how to add a photo to a frame online, you can use the same process for many different occasions. A well-matched template can turn an ordinary image into a complete design without requiring you to build a layout from scratch.
Birthday memories
Create themed birthday images for children, family members, friends, or milestone celebrations.
Family collages
Combine family portraits, reunions, holidays, and everyday moments in one organized layout.
Wedding photos
Present engagement, ceremony, reception, and anniversary images with a coordinated visual style.
Travel highlights
Arrange landscapes, landmarks, food, and portraits into a visual summary of a trip.
Gaming moments
Show achievements, team members, character profiles, or memorable screenshots in themed frames.
Seasonal greetings
Create shareable images for holidays, festivals, school events, and special announcements.
Frequently Asked Questions
Can I add a photo to a frame without Photoshop?
Yes. An online photo frame maker allows you to choose a template, upload a picture, adjust its visible area, and save the finished design without installing professional desktop software.
Does MRRFrame add a watermark or require registration?
No. You can use MRRFrame to add your photo to a frame and download the finished design without a watermark. You also do not need to create an account before using the tool.
How do I learn how to add a photo to a frame online?
Choose a suitable frame template, select a photo slot, upload your picture, adjust the position and zoom, inspect the complete design, and save the result.
Why does part of my photo disappear inside the frame?
The photo and the frame slot probably use different aspect ratios. The editor crops part of the image so that it completely fills the available area. Reposition the image, reduce the zoom, or choose a frame with a more suitable orientation.
What type of photo works best in an online frame?
Use a clear, high-resolution photo with some space around the main subject. The photo should ideally have an orientation similar to the selected frame slot.
Can I add more than one picture to a frame?
Yes, provided that you choose a template containing multiple photo slots. Fill each slot separately and review the entire composition before saving the final image.
How can I stop a face from being cut off?
Drag the photo until the face is centered inside the visible area and reduce the zoom when possible. Leave a small margin above the head and around the sides of the face.
Why does my finished framed photo look blurry?
The uploaded source image may be too small or heavily compressed. Try using the original file instead of a screenshot, thumbnail, or image downloaded from a messaging application.
Should I choose the frame or the photo first?
Either approach can work, but choosing a frame based on the orientation and subject of your existing photo usually reduces cropping problems.
Final Thoughts
Once you understand how to add a photo to a frame online, the most important decisions are choosing a compatible template and positioning the subject carefully. Start with a clear source image, match its orientation to the photo slot, avoid excessive zooming, and inspect the complete design before saving.
The process becomes even faster once you know how many photo slots you need and which aspect ratio matches the destination. Instead of manually constructing a design, you can begin with a ready-made MRRFrame template and focus on selecting the right photos for the occasion.
Ready to try it yourself? Open MRRFrame and add your photo to a frame online. You can choose a template, upload your image, and download the final result without a watermark or account registration.